Docker for Macを使ってみる
現状は、Vagrantを使って開発環境を構築することが多いのですが、最近はDockerを使って開発しているという話をよく聞きます。 DockerだとマシンスペックをVMほど使用しないというのがメリットの一つらしく、素早く軽量に開発環境を整えるため役立つのかな?と思い勉強したいと思います。
Dockerのインストール
公式ページからMacアプリをダウンロードすることもできますが、 今回はHomebrew経由でインストールします。
brew cask install docker
- インストールが完了したらDocker.appを起動

- Docker appがシステムにアクセスするための許可を求められるためOKを押下してパスワードを入力

- 上記画面が表示されるようになってDockerコマンドが使えるようになっていればインストール完了です
docker --version

Docker version 1.12.3, build 6b644ec
docker run -d -p 80:80 --name webserver nginx
Dockerコンテナを起動する
- Dockerのチュートリアルの通り2つのイメージを起動してみます。
hello-world
% docker run hello-world


Hello from Docker!
This message shows that your installation appears to be working correctly.

To generate this message, Docker took the following steps:
 1. The Docker client contacted the Docker daemon.
 2. The Docker daemon pulled the "hello-world" image from the Docker Hub.
 3. The Docker daemon created a new container from that image which runs the
    executable that produces the output you are currently reading.
 4. The Docker daemon streamed that output to the Docker client, which sent it
    to your terminal.

To try something more ambitious, you can run an Ubuntu container with:
 $ docker run -it ubuntu bash

Share images, automate workflows, and more with a free Docker ID:
 https://cloud.docker.com/

For more examples and ideas, visit:
 https://docs.docker.com/engine/userguide/
docker runコマンドはdockerイメージからのコンテナを起動するコマンドです。- 上記の出力を見るとローカルにimageが存在しないときは、Docker Hubから該当するimageを探してダウンロードするようです。
nginx
% docker run -d -p 80:80 --name webserver nginx

cdea6236c8862e3768b3560034c28c41dd7534a706a1e76b30a25c763962b32c
- 出力されているのは、コンテナの識別IDです。
-d: コンテナをバックグラウンドで起動する-p: ポート指定、<ホストのポート>:<コンテナのポート>で割当を行う。 例: <80>:<12345> コンテナの12345ポートをホストの80ポートに割り当てる--name: コンテナに名前を割り当てる
この状態で、localhostにブラウザでアクセスするとnginxのデフォルト起動画面が確認できます。

% docker ps

CONTAINER ID        IMAGE               COMMAND                  CREATED             STATUS              PORTS                         NAMES
cdea6236c886        nginx               "nginx -g 'daemon ..."   4 minutes ago       Up 4 minutes        0.0.0.0:80->80/tcp, 443/tcp   webserver
docker psで現在起動中のコンテナを確認できます。
その他のDockerコマンド
イメージの一覧
- ローカルに保存されているDocker imageを確認する
docker images
コンテナの停止
- dockerコンテナを停止する
docker stop <name or ID>
コンテナの削除
- dockerコンテナを削除する
- 同じ名前のコンテナは作成できないため一度削除する必要がある
docker rm <name or ID>
参考
Oracle Database ExpressをCentOSにインストールする
Oracle Databaseは、基本的には商用(有償)のDBMSですが無償で使えるパッケージが有るみたいなので試してみます。
環境
パッケージのダウンロード
- ダウンロードページから
Oracle Database Express Edition 11g Release 2 for Linux x64をダウンロード ※ ダウンロードには、Oracleのアカウント登録が必要です
sudo yum install -y unzip
unzip oracle-xe-11.2.0-1.0.x86_64.rpm.zip
インストール
- 必要なコマンドをインストール
sudo yum install -y glibc make gcc binutils libaio libaio-devel bc net-tools
sudo dd if=/dev/zero of=/swap bs=1M count=2048
sudo chmod 600 /swap
sudo mkswap /swap
sudo swapon /swap
cat /proc/swaps
vi /etc/fstab
/swap swap swap defaults 0 0
sudo rpm -ivh Disk1/oracle-xe-11.2.0-1.0.x86_64.rpm
- インストール成功すると最後に
You must run '/etc/init.d/oracle-xe configure' as the root user to configure the database.
と表示されている
これはDB構成のコマンドらしいのでそのまま実行
sudo /etc/init.d/oracle-xe configure
- 対話型で設定が聞かれる
Oracle Database 11g Express Edition Configuration
-------------------------------------------------
This will configure on-boot properties of Oracle Database 11g Express
Edition.  The following questions will determine whether the database should
be starting upon system boot, the ports it will use, and the passwords that
will be used for database accounts.  Press <Enter> to accept the defaults.
Ctrl-C will abort.

// デフォルトのHTTPポート番号
Specify the HTTP port that will be used for Oracle Application Express [8080]:


// オラクルのポート番号
Specify a port that will be used for the database listener [1521]:

/etc/init.d/oracle-xe: line 405: netstat: command not found

// SYSTEMユーザーのパスワード
Specify a password to be used for database accounts.  Note that the same
password will be used for SYS and SYSTEM.  Oracle recommends the use of
different passwords for each database account.  This can be done after
initial configuration:
Confirm the password:

Do you want Oracle Database 11g Express Edition to be started on boot (y/n) [y]:y

Starting Oracle Net Listener...Done
Configuring database...
Done
Starting Oracle Database 11g Express Edition instance...Done
Installation completed successfully.
DBへアクセス
- コマンドの読み込み
. /u01/app/oracle/product/11.2.0/xe/bin/oracle_env.sh
- sqlplusでアクセス
sqlplus system
- パスワードを聞かれるため、先程設定したものを入力
sqlplus system

SQL*Plus: Release 11.2.0.2.0 Production on 日 3月 26 10:49:30 2017

Copyright (c) 1982, 2011, Oracle.  All rights reserved.

パスワードを入力してください:


Oracle Database 11g Express Edition Release 11.2.0.2.0 - 64bit Production
に接続されました。
SQL>
- 正しくログインできれば設定完了
MySQLより説明が少なく少なくイメージがありますね。
さくらVPSにOSをインストールしてroot以外のUserを作成する
1.さくらVPSにOSをインストール

今回は、CentOS7を選択
rootで接続できるか確認
ssh -p 22 root@<IPアドレス>
※さくらVPS上のコンソールからrootでログインできるかを確認してもOK
2.Chefの環境を構築
- Chef自体のもろもろの設定についての説明は割愛する
- Chefの設定は色々難しいので間違っているかもしれない…
Chefのツールのインストール
Chef Development Kitのインストール
chef gem install knife-zero
Chefのリポジトリ作成
chef generate repo <chef-repo_name>
knifeの設定ファイル作成
knife configure
- ~/.chef配下に
knife.rbができる
vim .chef/knife.rb
- ローカルプロジェクトの設定
local_mode true
log_level                :info
log_location             STDOUT
chef_repo_dir = File.absolute_path( File.dirname(__FILE__) + "/.." )
cookbook_path ["#{chef_repo_dir}/cookbooks", "#{chef_repo_dir}/site-cookbooks"]
node_path     "#{chef_repo_dir}/nodes"
role_path     "#{chef_repo_dir}/roles"
リモートサーバーのknife zeroを初期化
knife zero bootstrap <IPアドレス> --ssh-user root --node-name reter-product
※ 途中rootのパスワードを聞かれるため、手順1で設定したパスワードを入力
- 作成が成功するとプロジェクト配下の
clients/、nodes/配下にリモートnodeの設定ファイルが作成される
3.ユーザーを作成する
- ユーザーの作成は、サードパーティのcookbookを使用する
- cookbookの管理にはBerkshelfを使用する
外部cookbookのインストール
vim Berksfile
site :opscode
cookbook 'user'
chef exec berks vendor ./cookbooks
- userというcookbookは
LWRPという方法でuserの作成を提供しており準じた形式で記述するだけでユーザーを簡単に作成できる
ログインユーザー用のssh-keyを作成
ssh-keygen -t rsa -b 4096 -f <ファイル名>
- 作業ユーザーのssh用のキーを作成
user作成用のcookbookの作成
cd site-cookbooks
chef generate cookbook site-user
vim site-cookbooks/site-user/recipes/default.rb
user_account '<作成するユーザー名>' do
  action :create
  ssh_keys  ['
ssh-rsa ...
'] # 作成したsshの公開鍵を指定する
end
本番用のロールを作成
vim roles/initial_setting.json
{
    "name": "initial_settings",
    "description": "This is initial recipes.",
    "chef_type": "role",
    "json_class": "Chef::Role",
    "default_attributes": {
    },
    "override_attributes": {
    },
    "run_list": [
        "recipe[user]",
        "recipe[site-user]"
    ]
}
- 実行するレシピをnodeファイルごとに制御するのは、大変なのでロールに分けておく
- roleのrun_listには、インストールした外部cookbookである
userと自作したsite-userを追加する- 実行順序はuserが先
ロールをnodeに追加
knife node run_list add <bootstrapのときに作成されたnode名> 'role[initial_settings]'
リモートサーバーに反映
knife zero converge "name:reter-production" --ssh-user root
sshでログインできるか確認
ssh <ユーザー名>@<サーバーIP> -i <sshの秘密鍵>
- ログインできていれば正しくユーザーが作成されている
作成したユーザーのSudo権限を許可
レシピをダウンロード
vim Berksfile
site :opscode
cookbook 'user'
cookbook 'sudo' # 追加
chef exec berks vendor ./cookbooks
環境設定のファイルを作成
chef exec knife environment create production -e vim
- ユーザー個別の設定は、環境依存のため設定ファイルを作成
sudo設定を記載
vim environments/production.json
{
    "name": "production",
    "description":"Production User and Parmission",
    "chef_type": "environment",
    "json_class": "Chef::Environment",
    "default_attributes": {},
    "override_attributes": {
        "authorization": {
            "sudo": {
                "users": ["<sudo権限を与えるユーザー>"],
                "passwordless": "true"
            }
        }
    }
}
nodeファイルを編集して環境をproductionに変更する
chef exec knife node edit reter-production -e vim
設定を反映
knife zero converge "name:<ロール名>" --ssh-user root
sudoを実行できるか確認
ssh <ユーザー名>@<サーバーIP> -i <sshの秘密鍵>
sudo vim /etc/sudoers
- 設定したuserにsudo設定がされていればOK
【iOS, swift】swiftコーディング規約
※ Swift 2.3をベースに記載
自分がswiftを書くときのコーディング規約を記載します。
クラス
- Pascal記法 (大文字で始まる) で記述する
// ◯
class ViewController: UIViewController {

}

// ☓ snake case
class view_controller: UIViewController {
・・・
}
継承する時にクラス名の後ろにつける:は:の後ろにスペースを入れる
// ◯
class ViewController: UIViewController {
}

// ☓
class view_controller:UIViewController {
}
メソッド
- Camel記法(小文字始まり)で記述する(
hogeFuga) - メソッド名は動詞を使う
;は付けない{の行は改行しない。前にスペースを入れる。->の前後はスペースを入れる
// ◯
func getName() -> Strig {
    return "name"
}

// ☓ name snake
func getName() -> Strig {
    return "name"
}

// ☓ break
func getName() -> Strig
{
    return "name"
}

// ☓ space
func getName()->Strig {
    return "name"
}
変数・プロパティ(保持型・計算型)
- Camel記法(小文字始まり)で記述する(
hogeFuga) - 行末に
;は付けない - privateな保持型プロパティは
_から始める(_hogeFuga) - interlな保持型プロパティは
internalを省略する- 理由: 基本的にスコープは厳格にすべきである。
- しかし
privateスコープはテストファイルから参照できない。 - テストを書くことの方が重要のため基本的に
internalであることを許可する。 internalがデフォルトであるため、冗長を削除するため省略して良しとする。
- 基本的に
publicは使用しない- 理由: 同じモジュール内であれば参照可能なためPublicは必要ない
- ※ APIを定義する場合は必要
計算型プロパティのgetがある場合はprivateでOK
class Sample {
    // ◯
    var userName: Int;
    private var _userMessage: String;

    func hoge() -> Int {
        let age = 10
        return age
    }

    private var _inSpeed: Double = 0
    var speed: Double {
        get {
            return self._inSpeed + 10;
        }

        set(speed) {
            self._inSpeed = speed
        }
    }

    // ☓ Pascal
    var UserName: String;
    // ☓ not `_`
    private var userLevel: Int;
}
- storybord(or xib)上で強参照する変数(ViewController.viewが保持するなど)は
@IBOutlet weak varで宣言する
// ◯
@IBOutlet weak var clickHogeButton: UIBarButtonItem!

// ☓
@IBOutlet var clickHogeButton: UIBarButtonItem!
- 読み取り専用のプロパティと添字付けのgetterは暗黙的にする
- 可能な限り、読み取り専用のプロパティと添字付けでは
getキーワードを省略する - 理由: 意図と意味が明確だから。コードも少なくて済む。
// ◯
var myGreatProperty: Int {
    return 4
}

subscript(index: Int) -> T {
    return objects[index]
}

// ☓
var myGreatProperty: Int {
    get {
        return 4
    }
}

subscript(index: Int) -> T {
    get {
        return objects[index]
    }
}
enum
// ◯
enum CustomResult {
    case Success,
    case Error
}

// ☓ upper case
enum CustomResult {
    case SUCCESS, ERROR
}

// ☓ Case is not omitted
enum CustomResult {
    case Success, Error
}
if
- 判定式に
()は付けない {の前には改行は入れない
// ◯
let x = 1
if x == 1 {
    print("")
}

// ☓
let x = 1
if (x == 1) {
    print("")
}
for
for-inを使用する{の前には改行は入れない- cの構文
for(let i; i < 10; i++)は使わない(非推奨になっている)
// ◯
var sum: Int = 0
for i in 1...10 {
    sum += i
}

// ☓
var sum: Int = 0
for (var i = 1; i <= 10; i += 1) {
    sum += i
}
switch
{の前には改行は入れないswitchとcaseの左は揃える
// ◯
let c: Int = 1
switch c {
case 1:
    print("")
}

// ☓
let c: Int = 1
switch c
{
    case 1:
        print("")
}
可能な限りvar宣言よりもlet宣言を使う
- 理由:
letは値が変わらないことを保証するためより安全で明確なコードになる
1行の文字数
- 努力目標:80文字
- 最大:100文字
識別子に型を指定する時は、常に識別子のすぐ後ろにコロンを置き、空白を一つあけて型名を書く
// ◯
class MyClass: SuperClass { ... }
let myConst: Int = 2
func myFunc(type: Int) -> String { ... }

// ☓
class MyClass:SuperClass { ... }
let myConst:Int = 2
func myFunc(type:Int) -> String { ... }
明示的なself参照は必要な時だけ
selfの持つプロパティやメソッドへアクセスする時、デフォルトではselfへの参照は省く- 理由: クロージャにおける
selfのキャプチャリングが目立つようになる。その他の場所における冗長さが無くなるため。
class MyClass {
    var hoge: Int

    // ◯
    func myFunc() {
        hoge = 1234
    }

    var myClosure: () -> () {
        return {
            self.hoge
        }
    }

    // ☓
    func myFunc() {
        self.hoge = 1234
    }
}
【Swift 2.0】クラスのプロパティ名を取得する
swiftでクラスからプロパティ名のリストを取得する方法です。
static func propertyNames() -> Array<String> {
    var names: Array<String> = []
    var count: UInt32 = 0
    self.classForCoder()
    let properties:UnsafeMutablePointer<objc_property_t> = class_copyPropertyList(self.classForCoder(), &count)
    for var i: UInt32 = 0; i < count; i++ {
        let property = properties[Int(i)];
        let cname = property_getName(property)
        let name = String.fromCString(cname)
        names.append(name!)
    }
    free(properties)
    return names
}
【Rails4】GrapeをつかってAPIを作成する
Grapeとは
REST-likeなAPIを作成する為のフレームワークです。 詳しくは、Grape githubを参照してください。
今回は、サンプルアプリケーションを作成し、jsonを返すAPIを動かしてみます。
サンプルプロジェクトにGrapeをインストール
任意のRailsアプリケーションを作成します。
rails new grape_api --skip-bundle -T
Gemのインストール
作成したアプリケーションのGemfileを編集し、grapeのGemをインストールします。
■ Gemfile
gem 'grape'
bundle install
// ※ローカルにインストールする場合は、--path vendor/bundleをつける
ディレクトリを作成する
API経由でデータを参照するために任意のモデルを作成します。
# userテーブルを作成しDBへ反映
rails g scaffold user name:string
rake db:migrate
ディレクトリは、下記のような構成にします。
- app
  - apis
    - api
      -v1
       - users
      -vXX
# とりあえず、v1のディレクトリのみ作成
mkdir -p app/apis/api/v1
今回は、上記のファイル構成を元に、
という2つのAPIを作成します。
ファイルの自動インポートの設定を行なう
apisディレクトリ配下に置かれたファイルが自動的にRailsのファイルパスに追加されるようにapplication.rbを以下のように編集します。
■ config/application.rb
module GrapeApi
  class Application < Rails::Application
    # app/api配下の.rbファイルを読み込み対象にする
    config.paths.add File.join('app', 'apis'), glob: File.join('**', '*.rb')
    config.autoload_paths += Dir[Rails.root.join('app', 'apis', '*')]
  end
end
APIのパスをルーティングする
APIのルートパスを定義します。
■ config/routes.rb
Rails.application.routes.draw do
・・・
  # APIモジュールのBaseクラスを'/'Pathとして定義する
  mount API::Base => '/'
・・・
end
Baseクラスを作成
ルーティングしたAPI::Baseクラスを定義します。
prefixにapiを定義することでhttp://[host]/apiのpathを構成することができます。
■ /app/apis/api/base.rb
module API
  class Base < Grape::API
    # Baseクラスのpathを定義する
    prefix 'api'

  end
end
上記のBaseクラスと同じようにv1ディレクトリ配下にもbase.rbを作成します。
versionを定義することでhttp://[host]/api/v1のpathを構成することができます。
formatでAPIのレスポンスデータのフォーマットをjsonに指定しています。
■ /app/apis/api/v1/base.rb
module API
  module V1
    class Base < Grape::API
      version 'v1'
      format :json
    end
  end
end
先ほど作成したAPI::BaseにAPI::V1::Baseをマウントします。
■ /app/apis/api/base.rb
module API
  class Base < Grape::API
    # Baseクラスのpathを定義する
    prefix 'api'

    # v1のBaseクラスをマウントする
    mount API::V1::Base
  end
end
apiクラスを作成
v1ディレクトリ配下にusersクラスを作成します。
resourceでapiのpathを定義しています。
■ /app/apis/api/v1/users.rb
module API
  module V1
    class Users < Grape::API
      # `users`resource配下にすることで
      # /api/v1/usersのapiとしてアクセスできる
      resource :users do
        # GET http://[host]/api/v1/users
        get do
          User.all
        end

        # パラメタバリデーション
        params do
          requires :id, {type: Integer, desc: 'user id.'}
         end
         # GET http://[host]/api/v1/users/[user_id]
         get ':id' do
          User.find(params[:id])
         end
      end
    end
  end
end
API::V1::UsersをAPI::V1::Baseにマウントします。
■ /app/apis/api/v1/base.rb
module API
  module V1
    class Base < Grape::API
      version 'v1'
      format :json
    end
    mount API::V1::Users
  end
end
サンプルデータを作成してAPIにアクセス
ローカル環境でRailsサーバを起動します。
rails server
http://localhost:3000/usersにアクセスして、画面上から適当にデータを作成します。

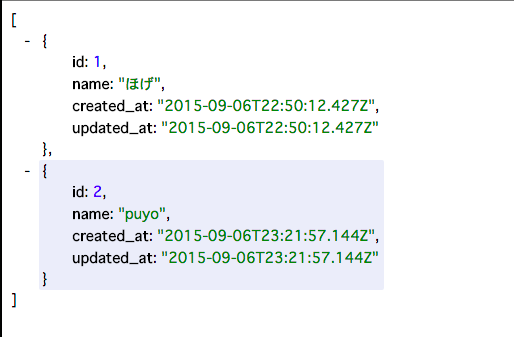
http://localhost:3000/api/v1/usersにアクセスするとUsersテーブルのデータの全件が取得できます。

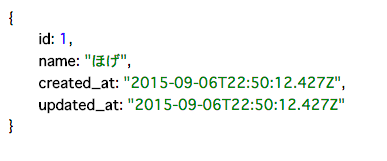
http://localhost:3000/api/v1/users/1にアクセスするとUsersテーブルのデータの1件目が取得できます。

参考サイト
http://kzy52.com/entry/2014/11/07/084023 http://qiita.com/hkusu/items/2ca0323cc276ab31e926